Kubernetes 服务发布之 F5-BIGIP
在 k8s 的世界中, 应用的一生可能稍纵即逝. 一个 pod 的存活时间可能只有几个小时甚至几分钟. 在这个快速变化的世界中里, Ingress 就像一位忙碌的交通警察默默地控制着集群内外流量的发布, 回收. 说到 Kubernetes Ingress 大家比较熟悉的是 nginx 或者是 envoy 这类基于软件实现的解决方案. 其实 Ingress 也可以基于硬件来实现. 硬件平台本身在流量的处理性能以及功能扩展上还是有软件无法相比的优势, 比如 IPV6/IPV4的转换, 基于硬件芯片的 ssl 加速处理能力, 基于硬件的 DDOS 防护以及应用安全等方面都提供了相对成熟, 易管理的方案. 下面这个例子中我们将一台 BIGIP 加入 k8s 作为其 ingress service 来为集群中的应用发布服务.
F5 通过官方发布的 CIS 来实现 BIG-IP 与 k8s 集群的整合. CIS 的全称是 F5 BIG-IP Container Ingress Services, 之前也被称为 BIGIP Controller. 它在 k8s 中作为一个 pod 的形式出现, 其作用主要负责监控 k8s 中 service/pod 的变化并将其发布到 BIGIP 上. CIS 以 NodePort 或者是 ClusterIP的方式在 BIG-IP 上创建 monitor, pool, virtual server 来发布服务.
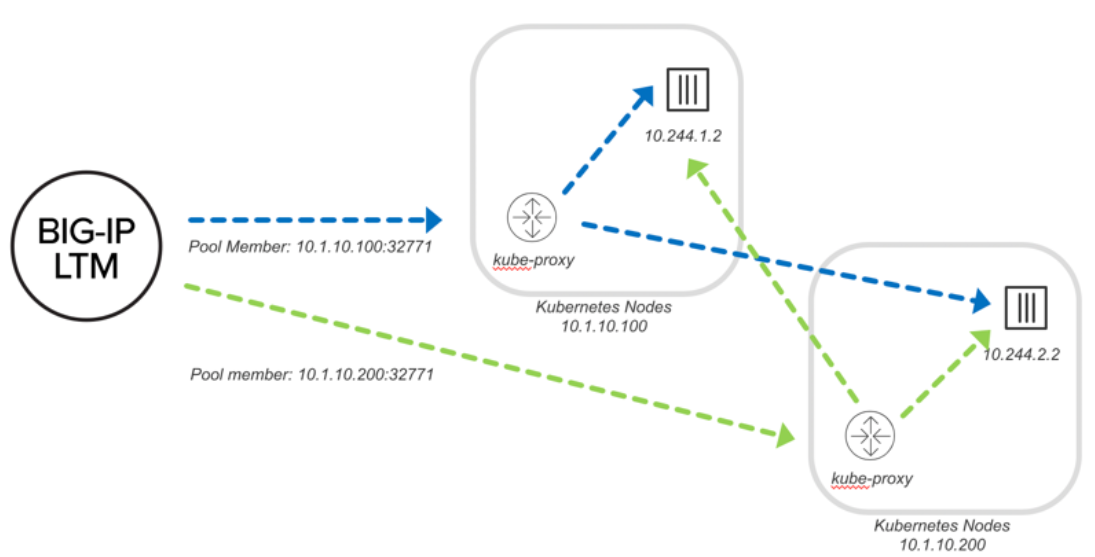
NodePort
通过 NodePort 发布应用时, BIG-IP 会将流量转发到 Node 上暴露的 NodePort 端口 (32771), 流量进入 Node 的 IP 10.1.10.100 与 10.1.10.200 后, 通过 kube-proxy 转发到对应的 pod 成员中(10.244.1.2 与 10.244.2.2). 所以在 NodePort 模式中, BIG-IP 中看到的 pool member IP 是 Node 的 IP 和端口.
如下图(转自官网):
下面我们就来将一台 BIG-IP 整合到 k8s中:
在 BIG-IP 上创建partition: k8s
1
tmsh create auth partition k8s
在 k8s 中创建 BIG-IP 的登陆账号. 用户名: admin/密码: admin
1
kubectl create secret generic bigip-login -n kube-system --from-literal=username=admin --from-literal=password=admin
创建安装 CIS 需要使用的 serviceaccount:
1
kubectl create serviceaccount bigip-ctlr -n kube-system
创建 ClusterRole 为 serviceaccount 分配权限: k8s_rbac_yaml
1
2
3
4
5
6
7
8
9
10
11
12
13
14
15
16
17
18
19
20
21
22
23
24
25
26
27
28
29
30
31
32
33
34
35
36
37
38
39
40
41
42
# for use in k8s clusters only
kind: ClusterRole
apiVersion: rbac.authorization.k8s.io/v1
metadata:
name: bigip-ctlr-clusterrole
rules:
- apiGroups: ["", "extensions", "networking.k8s.io"]
resources: ["nodes", "services", "endpoints", "namespaces", "ingresses", "pods", "ingressclasses"]
verbs: ["get", "list", "watch"]
- apiGroups: ["", "extensions", "networking.k8s.io"]
resources: ["configmaps", "events", "ingresses/status", "services/status"]
verbs: ["get", "list", "watch", "update", "create", "patch"]
- apiGroups: ["cis.f5.com"]
resources: ["virtualservers","virtualservers/status", "tlsprofiles", "transportservers", "ingresslinks", "externaldnss"]
verbs: ["get", "list", "watch", "update", "patch"]
- apiGroups: ["fic.f5.com"]
resources: ["f5ipams", "f5ipams/status"]
verbs: ["get", "list", "watch", "update", "create", "patch", "delete"]
- apiGroups: ["apiextensions.k8s.io"]
resources: ["customresourcedefinitions"]
verbs: ["get", "list", "watch", "update", "create", "patch"]
- apiGroups: ["", "extensions"]
resources: ["secrets"]
verbs: ["get", "list", "watch"]
---
kind: ClusterRoleBinding
apiVersion: rbac.authorization.k8s.io/v1
metadata:
name: bigip-ctlr-clusterrole-binding
namespace: kube-system
roleRef:
apiGroup: rbac.authorization.k8s.io
kind: ClusterRole
name: bigip-ctlr-clusterrole
subjects:
- apiGroup: ""
kind: ServiceAccount
name: bigip-ctlr
namespace: kube-system应用 YAML 完成 Cluster Role 与 serviceaccounts 的绑定
1
kubectl apply -f k8s_rbac.yaml
安装 CIS: cis_nodeport.yaml. 这里需要注意修改
--bigip-url将其指向 BIG-IP management IP 地址.--bigip-partition中指定 BIG-IP 上的 partition 名称, 在这里是 k8s. 另外需要注意的是--pool-member-type是 nodeport.1
2
3
4
5
6
7
8
9
10
11
12
13
14
15
16
17
18
19
20
21
22
23
24
25
26
27
28
29
30
31
32
33
34
35
36
37
38
39
40
41
42
43
44
45
46
47
48
49apiVersion: apps/v1
kind: Deployment
metadata:
name: k8s-bigip-ctlr-deployment
namespace: kube-system
spec:
# DO NOT INCREASE REPLICA COUNT
replicas: 1
selector:
matchLabels:
app: k8s-bigip-ctlr-deployment
template:
metadata:
labels:
app: k8s-bigip-ctlr-deployment
spec:
# Name of the Service Account bound to a Cluster Role with the required
# permissions
containers:
- name: k8s-bigip-ctlr
image: "f5networks/k8s-bigip-ctlr:latest"
env:
- name: BIGIP_USERNAME
valueFrom:
secretKeyRef:
# Replace with the name of the Secret containing your login
# credentials
name: bigip-login
key: username
- name: BIGIP_PASSWORD
valueFrom:
secretKeyRef:
# Replace with the name of the Secret containing your login
# credentials
name: bigip-login
key: password
command: ["/app/bin/k8s-bigip-ctlr"]
args: [
# See the k8s-bigip-ctlr documentation for information about
# all config options
# https://clouddocs.f5.com/containers/latest/
"--bigip-username=$(BIGIP_USERNAME)",
"--bigip-password=$(BIGIP_PASSWORD)",
"--bigip-url=<ip_address-or-hostname>",
"--bigip-partition=<name_of_partition>",
"--pool-member-type=nodeport",
"--insecure",
]
serviceAccountName: bigip-ctlr应用 YAML 完成 CIS 部署
1
kubectl apply -f cis_nodeport.yaml
ClusterIP
通过 ClusterIP 发布应用时, BIGIP 将流量封装在 VXLAN 的tunnel 中并直接转发到 pod. 通过这种方式, 应用流量无需通过 kube-proxy 进行二次转发因此更加高效, 所以在 BIGIP 上我们看到 pool member 的地址是 pod 的 IP 地址.
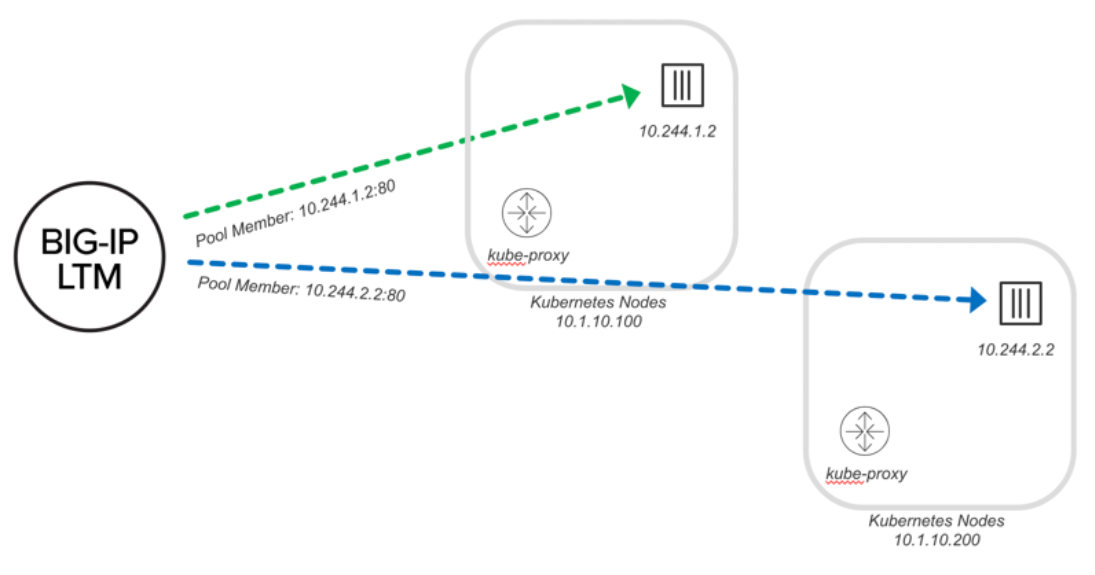
BIG-IP 可以直接得知 pod 中两个 container 实例的 IP 地址: 10.244.1.2 和 10.244.2.2, 同时流量也不用再通过 kube-proxy 进行转发.
部署 Cluster IP 模式的 CIS 步骤如下:
在 BIG-IP 上创建 partition: k8s
1
tmsh create auth partition k8s
在 BIG-IP 上创建 VXLAN Tunnel:
1
2
3
4
tmsh create net self 172.16.1.28/16 { allow-service all vlan Internal }
tmsh create net tunnels vxlan fl-vxlan port 8472 flooding-type none
tmsh create net tunnels tunnel flannel_vxlan key 1 profile fl-vxlan local-address 172.16.1.28
tmsh create net self 10.244.100.3 address 10.244.100.3/16 allow-service none vlan flannel_vxlan其中 172.16.1.28 是 BIG-IP 在 K8S 集群中的 Node IP 地址, 用来和集群中的其他 Node 进行通讯; 10.244.100.3 则是 pod 的 ip 地址, 用来和 pod 里的container 进行通讯.
在 k8s 中创建 BIG-IP 的登陆账号. 用户名: admin/密码: admin
1
kubectl create secret generic bigip-login -n kube-system --from-literal=username=admin --from-literal=password=admin
创建安装 CIS 需要使用的 serviceaccount:
1
kubectl create serviceaccount bigip-ctlr -n kube-system
创建 ClusterRole 为 serviceaccount 分配权限: k8s_rbac_yaml
1
2
3
4
5
6
7
8
9
10
11
12
13
14
15
16
17
18
19
20
21
22
23
24
25
26
27
28
29
30
31
32
33
34
35
36
37
38
39
40
41
42
# for use in k8s clusters only
kind: ClusterRole
apiVersion: rbac.authorization.k8s.io/v1
metadata:
name: bigip-ctlr-clusterrole
rules:
- apiGroups: ["", "extensions", "networking.k8s.io"]
resources: ["nodes", "services", "endpoints", "namespaces", "ingresses", "pods", "ingressclasses"]
verbs: ["get", "list", "watch"]
- apiGroups: ["", "extensions", "networking.k8s.io"]
resources: ["configmaps", "events", "ingresses/status", "services/status"]
verbs: ["get", "list", "watch", "update", "create", "patch"]
- apiGroups: ["cis.f5.com"]
resources: ["virtualservers","virtualservers/status", "tlsprofiles", "transportservers", "ingresslinks", "externaldnss"]
verbs: ["get", "list", "watch", "update", "patch"]
- apiGroups: ["fic.f5.com"]
resources: ["f5ipams", "f5ipams/status"]
verbs: ["get", "list", "watch", "update", "create", "patch", "delete"]
- apiGroups: ["apiextensions.k8s.io"]
resources: ["customresourcedefinitions"]
verbs: ["get", "list", "watch", "update", "create", "patch"]
- apiGroups: ["", "extensions"]
resources: ["secrets"]
verbs: ["get", "list", "watch"]
---
kind: ClusterRoleBinding
apiVersion: rbac.authorization.k8s.io/v1
metadata:
name: bigip-ctlr-clusterrole-binding
namespace: kube-system
roleRef:
apiGroup: rbac.authorization.k8s.io
kind: ClusterRole
name: bigip-ctlr-clusterrole
subjects:
- apiGroup: ""
kind: ServiceAccount
name: bigip-ctlr
namespace: kube-system应用 YAML 完成 Cluster Role 与 serviceaccounts 的绑定
1
kubectl apply -f k8s_rbac.yaml
在 k8s 集群中, 将 BIG-IP 抽象为一个 Node 对象. 这里的 VtepMAC 地址
00:50:56:86:b4:99是 BIG-IP 中 flannel_vxlan 的 MAC 地址:tmsh show net tunnels tunnel flannel_vxlan all-properties1
2
3
4
5
6
7
8
9
10
11
12
13
14
15apiVersion: v1
kind: Node
metadata:
name: bigip
annotations:
# Provide the MAC address of the BIG-IP VXLAN tunnel
flannel.alpha.coreos.com/backend-data: '{"VtepMAC":"00:50:56:86:b4:99"}'
flannel.alpha.coreos.com/backend-type: "vxlan"
flannel.alpha.coreos.com/kube-subnet-manager: "true"
# Provide the IP address you assigned as the BIG-IP VTEP
flannel.alpha.coreos.com/public-ip: 172.16.1.28
spec:
# Define the flannel subnet you want to assign to the BIG-IP device.
# Be sure this subnet does not collide with any other Nodes' subnets.
podCIDR: 10.244.100.0/24ClusterIP 的 cis_clusterip.yaml:
1 | apiVersion: extensions/v1beta1 |
- 应用 YAML 完成 CIS 部署
1
kubectl apply -f cis_clusterip.yaml
部署应用
完成 CIS 的部署后, 我们就可以尝试在 k8s 集群中部署应用并查看 BIG-IP 上的发布情况.
1 | apiVersion: v1 |
在 BIG-IP 上的 pool 以及 virtual server:
1 | # tmsh list ltm pool /k8s/* |
可以看到将 BIG-IP 做为 ingress 部署后, BIG-IP 可以自动探测到 k8s 集群中的应用发布变化并在 BIG-IP 上创建相应配置.